Are you looking for a simple way to install WordPress on your Ubuntu or Debian server? Look no further than aaPanel, a powerful yet user-friendly web hosting control panel that streamlines the entire process. In this article, we’ll guide you through the steps, ensuring you can get your WordPress site up and running in no time.

Why Choose aaPanel for WordPress Installation?
aaPanel offers a range of benefits that make it an ideal choice for installing and managing WordPress:
- Intuitive Interface: Even beginners can easily navigate the aaPanel dashboard.
- One-Click Installation: Deploy WordPress with a single click, saving you time and effort.
- Comprehensive Management: Manage databases, domains, FTP, and more, all within aaPanel.
- Performance Optimization: aaPanel helps you fine-tune your server for optimal WordPress performance.
Prerequisites
Before we dive in, make sure you have the following:
- An server with aaPanel installed. If you haven’t installed it yet, follow our guide: [How to Install aaPanel on Ubuntu/Debian]
- A domain name pointed to your server’s IP address.
Install WordPress Using aaPanel
Step 1: Access Your aaPanel Dashboard:
- Open your web browser and enter your server’s IP address followed by the aaPanel port (usually 7800). For example:
https://your_server_ip:7800 - Log in using your aaPanel credentials.
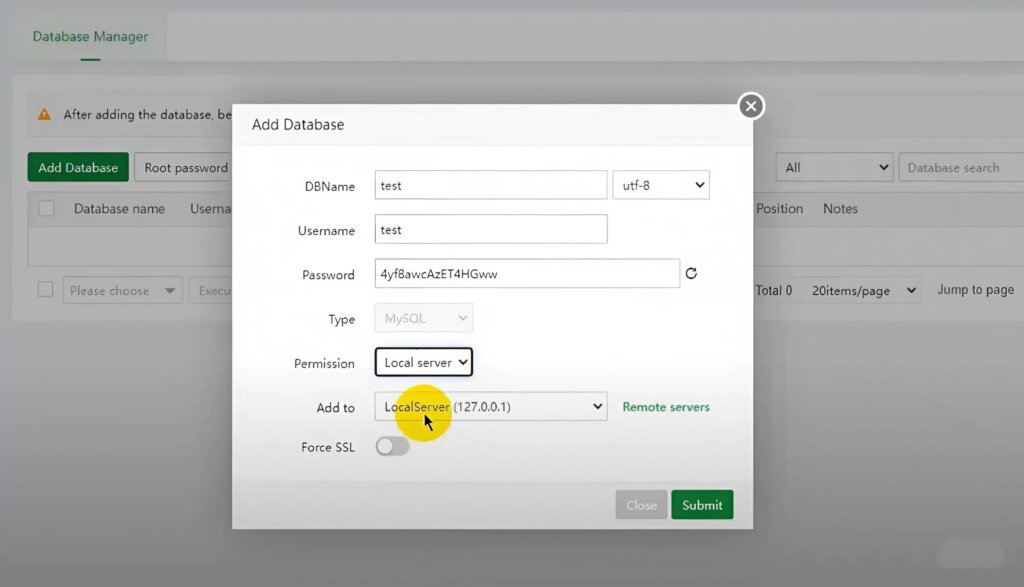
Step 2: Create a Database and User:
- In the aaPanel dashboard, click on “Databases.”
- Click “Add database.”
- Enter a database name (e.g.,
wordpress_db). - Choose a database character set (e.g.,
utf8mb4). - Click “Submit.”
- A new database user will be created automatically. Note down the username and password.

Step 3: Create a New Website:
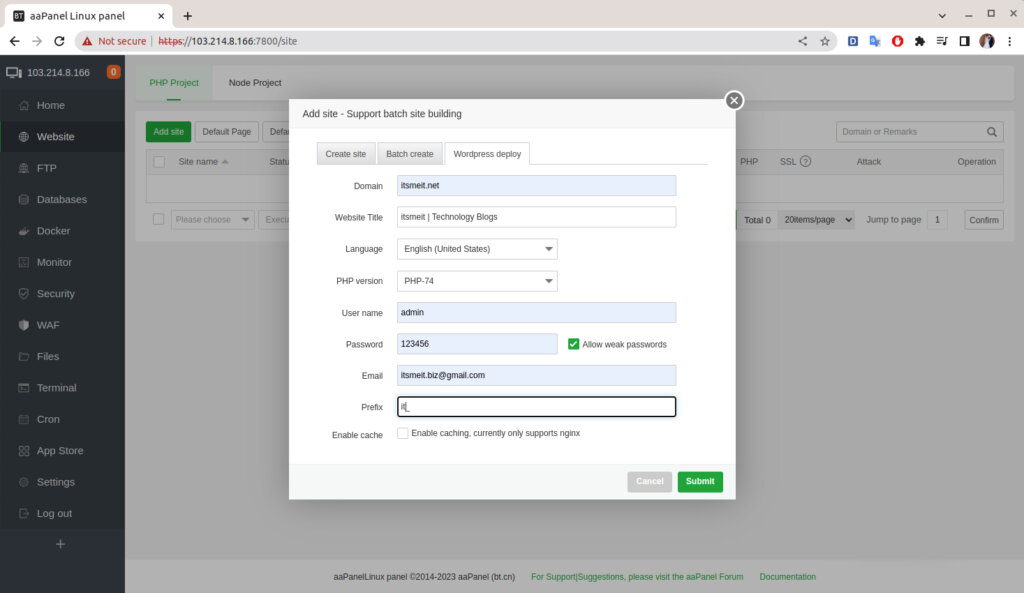
To install a website on aaPanel first make sure you have successfully installed Nginx or Apache and PHP+MYSQL. On the aaPanel interface click “Website->Addsite”, here We will click on the 3rd tab “Wordpress deploy” to install Wordpress on aaPanel.
- In the aaPanel dashboard, navigate to “Website” -> “Add Site.”
- Enter your domain name (e.g.,
yourdomain.com). - Select “One-Click Deployment” and choose “WordPress.”
- Fill in the required information (database name, username, password) and click “Submit.”

Step 4: Configure DNS Settings (If Needed):
- If your domain isn’t already pointed to your server, update your domain’s DNS records at your registrar to point to your server’s IP address.
Step 5: Install WordPress:
- aaPanel will automatically download and install the latest version of WordPress.
- Once the installation is complete, you’ll see a success message.
Step 6: Access Your WordPress Site:
- Visit your domain (e.g.,
http://yourdomain.com) to access your new WordPress site. - Log in with the username and password you created during the installation process.
Great job! You’ve successfully installed WordPress using aaPanel. Now you’re ready to start building and customizing your very own website. Take some time to explore the vast array of features and tools that both WordPress and aaPanel offer to create a unique and professional site.
In our next article, we’ll guide you through the process of installing an SSL certificate using either “Let’s Encrypt” or “Cloudflare” for your website on aaPanel. Be sure to check it out to enhance your site’s security and credibility.


