When you want to create an application that integrates Google services such as login with Gmail, sending emails via SMTP, Google Drive, Google Maps, or submitting articles for indexing, the first and most crucial step is to obtain a Client ID and Client Secret. In this article, I will provide detailed instructions on how to accomplish this task, saving you time and effort.

Step 1. Login and verify your account
To be able to create Client ID and Client secret, you must first sign in to your Google account. Open the Google Developers Console. If you’re logging in and using it for the first time you’ll have to do some verification from Google, just follow what’s shown on the screen once you’ve signed in.
Step 2. Create Project and authenticate
Once logged in, look at the blue menu bar at the top and click New Project, give the project a name and click Create to create a new one. The message line you will get “Remember to configure the OAuth consent screen with information about your application.” then click on OAuth consent screen to configure.
- User Type: If you are using the Client ID and Client Secret for internal purposes, choose “Internal”. If you want to enable APIs to allow customers to sign in socially with their Google accounts or to use external services, choose the “External” option.
- App information: You can name the app, contact email address, and logo.
- App domain: Enter your website and privacy policy page, and terms.
- Authorized domains: Enter your domain name or the name of the application that will use a Client ID and Client secret.
- Developer contact information: Enter your contact email and click Save and continue.
- Leave the Scopes, Optional info, Summary tab blank and click Save and continue
Step 3. Get Client ID and Client secret
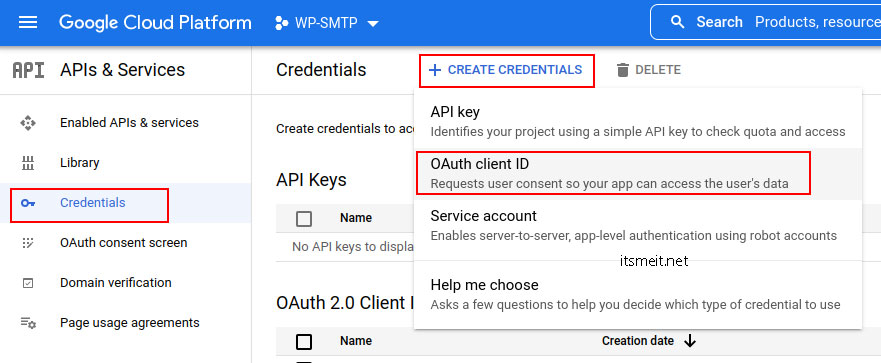
Next, in the left menu and click on Credentials and then click on “+ Create credentials” then select “OAuth client ID” to start creating a new Project as shown below.

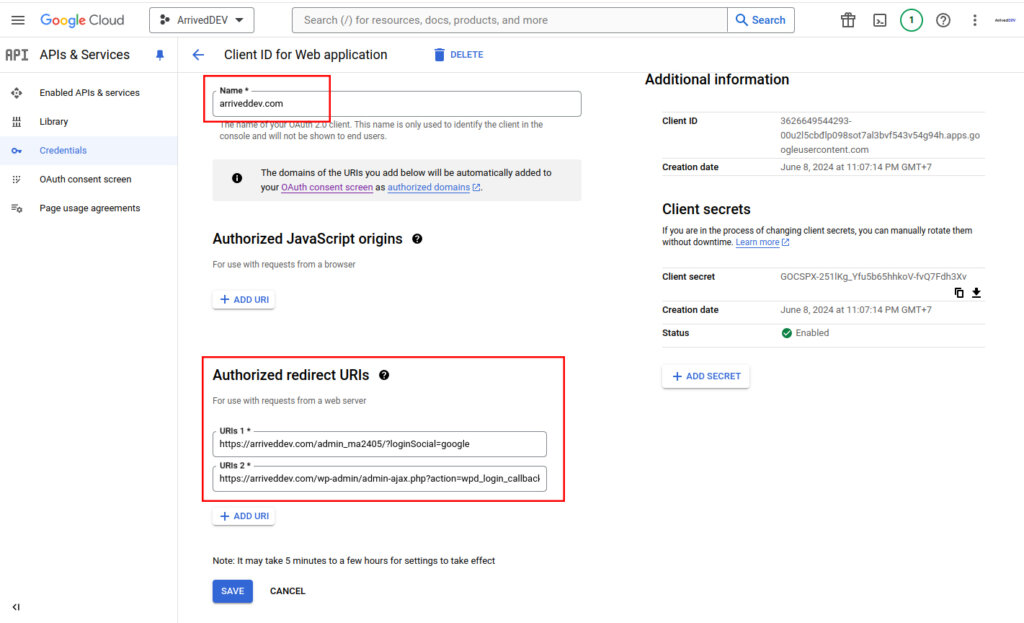
- Application type: Select web application
- Name the application.
- Authorized redirect URIs: Enter the redirect URI where you will implement/integrate the Client ID and Client Secret. This should be the URL of your application. For example, if you’re using the Nextend Social Login Pro plugin to configure SMTP and allow Gmail sign-in for WordPress, your redirect URI could be: https://yourdomain.com/wp-admin/?loginSocial=google

Finally, click Save you will get Client ID and Client secret Google displayed on the screen. You can also change the application’s information by clicking on the edit actions icon.

In conclusion, creating a Client ID and Client Secret for Google API involves just a few simple steps: accessing the Google Cloud Console, creating a new project, setting up the OAuth consent screen, and finally, generating the credentials. I hope this article has helped you gain a better understanding of this process and given you the confidence to start integrating Google APIs into your applications.


